Russ'
Russ'  Journal

 Here are my MAME adventures in ascending chrolological order. Photos are included when there's something worth looking at. :-)
1998-2000:
Found MAME on the 'net, downloaded a few ROMs, dreamt about building a cabinet.
Spring 2002:
Picked up a book PC for sale at a local liquidation center, including an Asus SP98-N mainboard with SIS 5598 chipset, on-board sound, video, 10/100 ethernet, infrared and USB in an Asus B5-N NLX case with 135-Watt power supply. Thought it would make a cool little box to build a MAME cabinet around.
Summer 2002:
Added an AMD K6-2/500 CPU, 160 MB PC-100 SDRAM, a 10 GB Western Digital hard drive, and an ATI Xpert@Play PCI video card with Rage Pro Turbo chipset, 8 MB SGRAM and TV-out to replace the crappy on-board video.
Spotted a Nokia 17" Multigraph 447X monitor by the dumpster behind my apartment building. After a quick once-over I fired it up and it's worked perfectly ever since! This is a decent monitor with a Sony Trinitron aperture-grille tube, 1600x1280 resolution, 0.25 mm dot pitch, and digital on-screen controls. Sweet! Just the thing to start with in a cabinet.
Loaded Windows 98 SE and set up for dual boot with plain DOS, AdvanceMenu front end, SciTech Display Doctor (now free!) and other cabinet/game utilities such as WinAmp, Click-N-Type and KeyScan.
Put the machine on my home network, completed the ROM collection from various sources, added other emulators.
Fall 2002:
Confirmed a friend could help me dig up an old arcade cabinet for conversion.
Winter 2002:
Traded the Nokia monitor with a friend for an Apple 19" Multiple Scan 20 monitor (1280x1024, 0.26mm, Trinitron aperture grille) with a PC VGA adapter. Even sweeter!
Ordered and received joysticks and buttons from Happ Controls and TNG Sales.
Won an eBay auction for two original Atari conical illuminated player start buttons.
My initial prototype control panel will have the following equipment:
- 2 Ultimate 8-way joysticks from Happ Controls
- 1 Red ball 4-way super joystick from Happ Controls (for old maze/climbing/shooter games)
- 6 Horizonal microswitch pushbuttons per player from Happ Controls (red, yellow, green, blue, orange, purple)
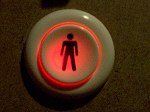
- 2 Original Atari conical illuminated player start buttons (flashed authentically by MAME) - not mounted yet
- 1 Kensington ExpertMouse 2.0 2¼" 2-button serial trackball (removed from case)
- Assorted buttons for credits, pinball flippers, MAME configuration/control, etc.
- A spinner to be designed and added later
- Hacked keyboard matrix decoding for now, maybe a proper encoder later
- Amplified stereo speakers with subwoofer, coin door, and fluorescent marquee illumination will be added to the cabinet
- Other ideas and upgrades to eventually implement as time/resources permit: (items already implemented have been struck out)
Relay on the PC power supply to turn on monitor, marquee light and amplified speakers with system power-up
- Key lock on free credit switches
- Full-time network connection for MP3 streaming, easy updates, etc. (wireless?)
- DVD drive for playing of Digital Leisure's laserdisk game emulations (Dragon's Lair, Space Ace, etc.)
Faster CPU/motherboard, more disk space, more RAM
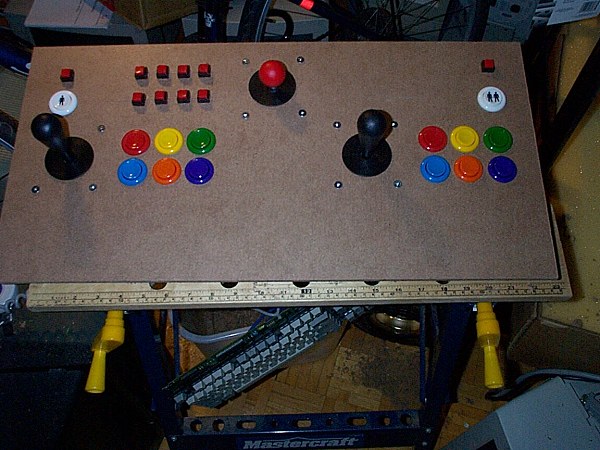
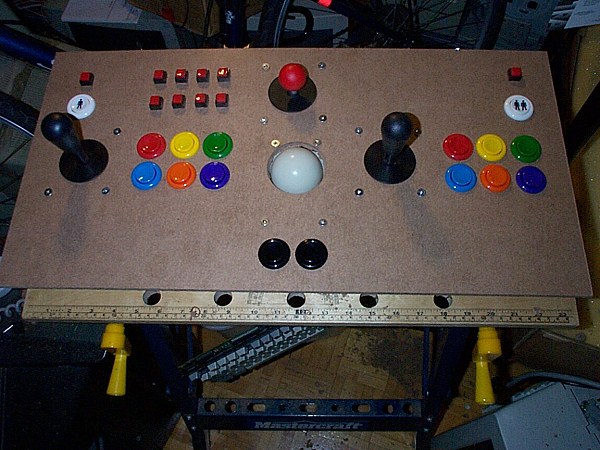
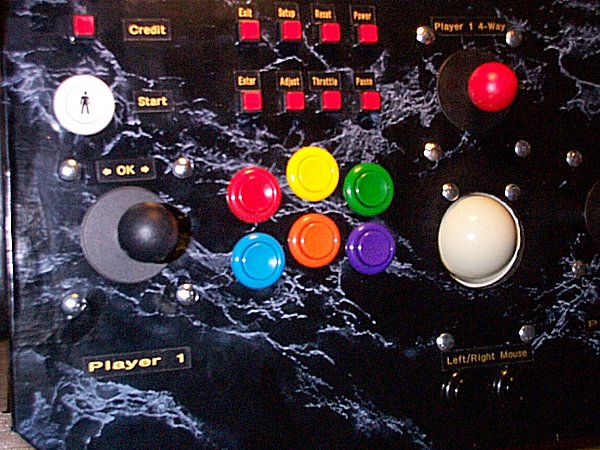
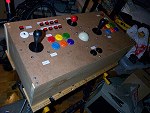
Put together a first-draft prototype control panel using a 1' x 2' piece of ¼" hardwood from Home Depot. It's still sloppy, but I'll try it for awhile to see if I want to move anything around (particularly the player buttons, which will likely end up in an arc). I have fairly long fingers and want to leave at least 5" between the front of the panel and the buttons to lay my palm flat without digging into the edge. Given my complete lack of woodworking skills, I'm quite pleased how it turned out (and I still have 10 fingers left). A spinner will eventually go in the upper right area, and the illuminated Atari buttons will be used for credits above the player start buttons when they arrive. Quick-disconnect spade lugs are used on all connections from the keyboard to the Cherry microswitches on the joysticks and pushbuttons, allowing easy modification and transfer to the final layout. Insulated cardboard washers were fashioned to prevent shorting the traces on the trackball circuit board with the mounting screws. Additional support will be added later since the trackball is mounted only by the circuit board now, and could be damaged by heavy downward pressure. Wires were soldered to the trackball circuit board across the (normally open) switch contacts and connected to the two black buttons in front.
Re-wired the prototype using 24-gauge stranded copper speaker wire. I'd initially used solid-core category-5 network cable, and even though it was nicely color coded in convenient 4-pair bundles, it was difficult to strip well and easily nicked. A couple of wires broke inside their insulation after installation in the panel, making troubleshooting difficult. The stranded wire was much easier to work with, stronger, and more flexible. I strongly suggest using only stranded wire in arcade cabinets.
Surrounded the edges of the control panel with ¾" by 8" pine for support, added cheezy handwritten paper labels. Replaced standard bolts with carriage bolts. Corner "L" brackets to be added for strength soon. Still waiting for the Atari buttons to arrive.
Click on the thumbnails below for a closer look at the prototype control panel:
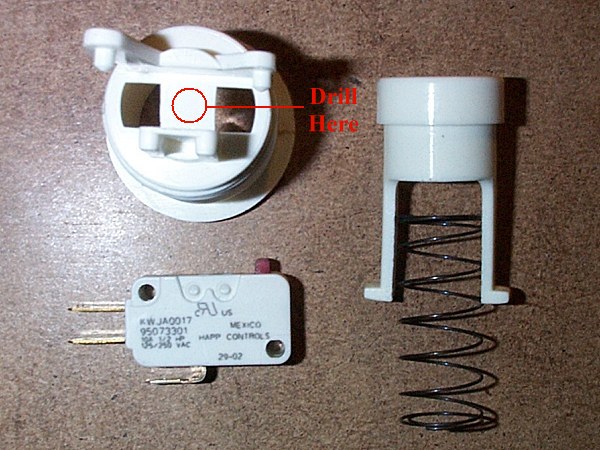
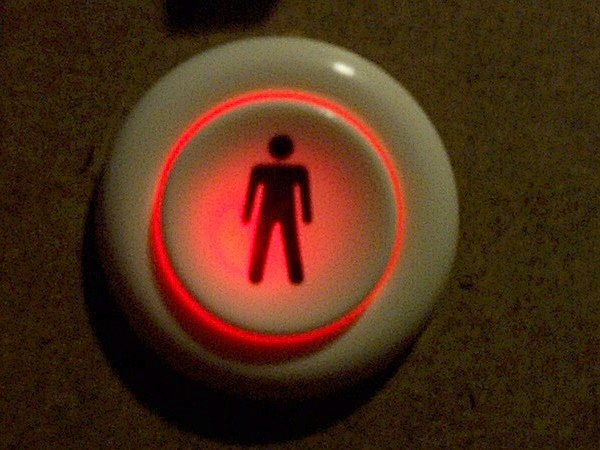
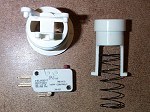
While waiting for my illuminated Atari player start switches to arrive, I decided to try a different idea I spotted on Erik Rudd's Web Page. It turns
out that the underside of the standard Happ player start buttons contain a spot custom made for drilling an LED mounting hole (horizontal-switch buttons like mine are a bit easier than vertical-switch buttons like his for this). There's a little
cross-brace across the bottom above the microswitch that can be carefully drilled out (about 5 mm diameter) to glue in the LED. Wires are carefully routed out to prevent interference with the switch action. The button assemblies themselves are not
totally opaque like they might appear. A sufficiently bright light inside will illuminate them quite well. Ordinary diffuse red LEDs are far too dim
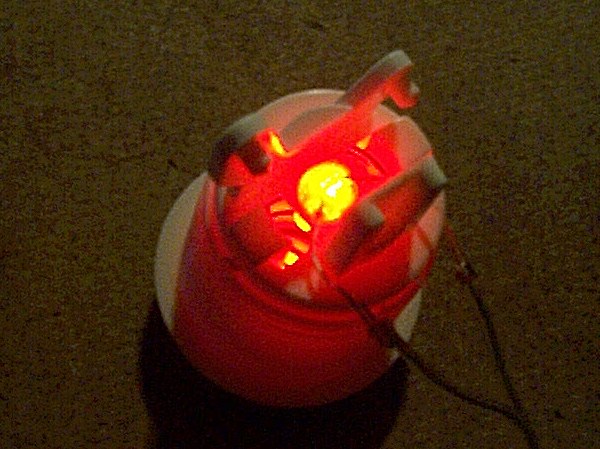
(around 5-10 mCd), but recent super-bright (3500+ mCd!) models with "water clear" bodies produce an intense bright light that's actually difficult to stare
into, but perfect for this purpose. The photos below illustrate the process. Don't forget that the wires will need to be attached after
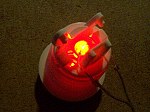
mounting the button in the control panel, screwing on the ring nut, and snapping on the microswitch. The original keyboard LEDs are unsoldered, the wires extended, and the new LEDs on the buttons connected in their place. Driving the LEDs from the keyboard controller allows them to
function properly with many old (mostly Atari) games that flash the appropriate player buttons as credits are added, such as Asteroids,
Centipede, Missile Command, Tempest, Marble Madness, Omega Race, Pac-Man, etc. Player 2 even blinks to mirror the brake lights in OutRun! I found my LEDs (5 for C$3.99) at the local outlet of Active Electronics, part #KSB-1383-5P, stock #38223. The nice thing about this modification is that if you don't like how it looks, you can simply disconnect the LED and the switch will appear and function just as before, with no changes visible on top. As noted on Kevin Steele's MAMEframe web page, this trick doesn't work well with the Ultimarc I-PAC keyboard encoder interface since the LEDs also blink when player 1's buttons 7 and 8 are pressed. Oscar Controls also has a page with some tips on this subject along with a transistor driver to provide more current to the LEDs, as does Carlos Wessels.
Here are some shots of the button modification:
Got dibs on an Invinco upright cabinet (©1979, Sega/Gremlin) in good shape, probably picking it up next week. It's 25½" wide x 28" deep x 67" high (65 x 72 x 170 cm). The control panel and marquee have been modified, and most of the cabinet has been painted dark grey. The only way to identify the original game is from the "flying monkey" artwork on the left side:

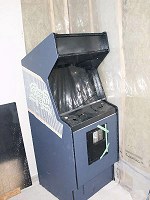
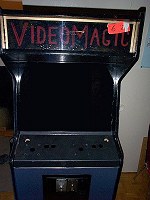
Woohoo! The cabinet was delivered today (thanks, Dale!). It's in good shape overall (for a 24 year old particleboard box subject to public abuse), though the coin mechanisms will need work - one is corroded while the other's slot has been blocked with a sheet metal screw for unknown reasons. I'll need to replace the missing lock too. The marquee is actually a home-made one saying "Video Magic" that was later inverted and painted black, making a black background when once again viewed from the front. Took a while to realize that the only way to get it out was to loosen and tip up the whole cabinet top cover. I'll eventually replace it with a better one and add a fluorescent light and speakers up top as well.
Picked up a 2' square piece of ½" plywood at Home Depot for the monitor mounting panel, along with a mailbox lock that fit the coin door perfectly and a 2' piece of piano hinge for the control panel. Also got a used Skil 4235 variable-speed electric jigsaw (sabre saw) at the local outlet of Cash Converters to cut the mounting panel. Managed to get one of the coin mechanisms working well enough to reliably detect quarters (though it probably passes similar slugs as well). I'll use a keyswitch from an old AT PC case to disconnect the common lead from the control panel credit switches to allow free play when I want it, or perhaps just put an ordinary switch inside the locked coin door for the same purpose, depending on the final method of hinging and securing the control panel.
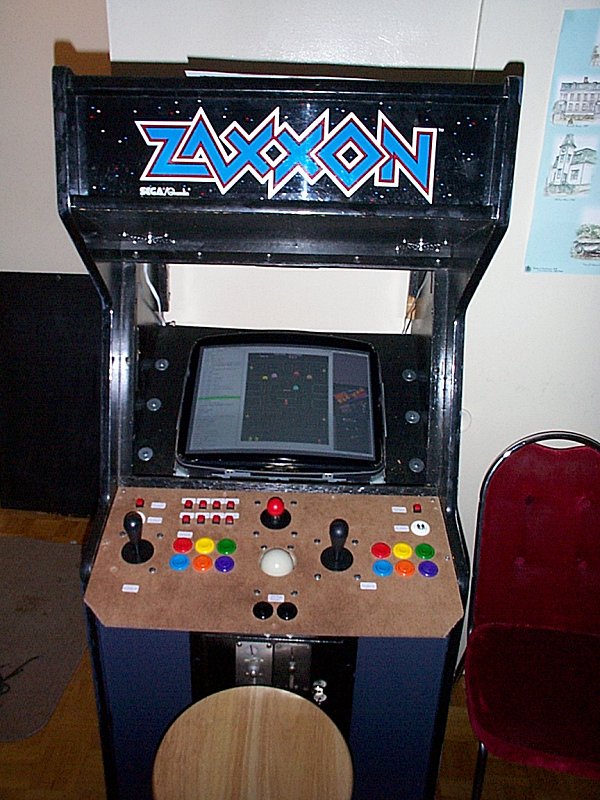
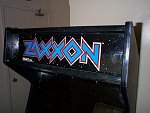
Dropped by Canus Plastics downtown to get a translucent marquee-sized (23¾" x 6½") piece of 1/8" acrylic and got a cheap 18" fluorescent light fixture from Wal-Mart. Looks great, especially with the light at the back of the upper shelf to minimize shadows from the speakers also located up there. Haven't decided whether to get a custom MAME marquee made up or just stick with the Zaxxon one on the way thanks to eBay. Note that not all marquees are the same size. Consider this before ordering one to go into a different cabinet. I went with this later release also from Sega/Gremlin to fit in the Invinco cabinet.
Went totally overboard and picked up an Abit KG7-RAID motherboard and AMD Athlon XP 1500+ CPU (with a decent Thermaltake Volcano 5 heatsink/fan) from a local seller through eBay. Threw in a 256MB stick of PC2700 DDR RAM, and found I could overclock it from 133 to 150 MHz FSB without any other tweaks, giving the equivalent performance of a 1700+. All MAME games now run at 100% without frameskip, apart from a few that would require a much faster CPU. After much playing around with a Soundblaster Live! card, I was able to get its DOS drivers working, and stuck in an old 10 Mbit network card for easy updates. The original DOS drivers on the SB install CD didn't work - I had to use the one available for download in the Hardware section of Easy MameCab. The PCI Xpert@Play seems to do fine (not needing 3D), so I'll stick with it for now. A few games are running slower in DOS mode for some reason (even with the same settings as MAME32), so it'll take some more tweaking to see why that's happening. Looks like they're OK in AdvanceMAME, so I may need to bite the bullet and tweak its video modes to use my monitor in its optimal resolutions. I've also officially given up hope on the Atari illuminated player start buttons as being lost in the mail, but I'm quite happy with my home-made replacements (see above).
Found out why some games were running slowly in DOS mode - the plain DOS version of MAME only uses a few standard VESA video modes, most of which are way off from standard arcade monitor resolutions. It picks the next highest VESA mode that will fit both dimensions, which may be much higher. S.T.U.N. Runner, for example, looks like a letterboxed movie with big black bars above and below because of its non-square pixel shape and odd resolution (512x240). Running at higher resolutions than necessary slows MAME way down, possibly moreso with my PCI video card. After much tinkering with AdvanceMAME, I was able to get all games running full-screen in their native resolutions at maximum speed. It takes a while to get working properly with lots of manually editing configuration files, but I highly recommend AdvanceMAME (and the companion front-end AdvanceMenu) to get the best out of a DOS MAME cabinet. It works particularly well with limited-frequency arcade monitors and TVs too.
Received and installed the Zaxxon marquee. It looks great, especially when backlit. Software tweaking and woodwork continues.
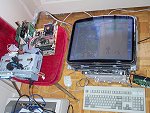
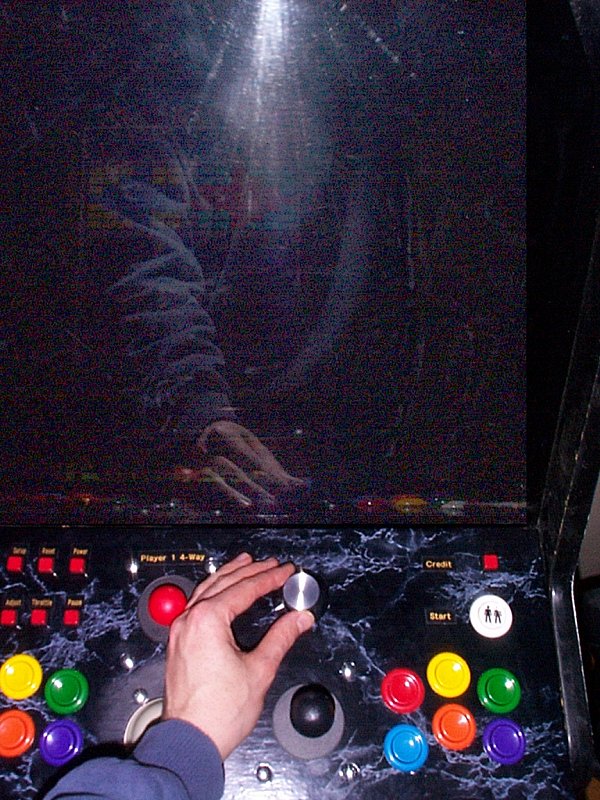
Got the monitor mounting panel cut out and painted black (Thanks JP and Jamie!). Managed to get the monitor taken out of its plastic shell, onto the panel and mounted in the cabinet (That sucker's heavy, 60+ pounds, thanks Darrin!) - just had to try hooking up the motherboard and drives long enough to check it out. It's gonna rock! Also picked up a 35-foot network cable to allow temporary cabinet hookup for updates, etc. Pictures coming soon, camera currently out on loan. :)
The power control relay system is now set up. The PC power supply receives AC continuously, and a relay (from Add Electronics) with its coil on the +12 Volt line switches a power bar through its 10-Amp contacts for the monitor, marquee light and speaker system when the motherboard boots, allowing the whole cabinet to be turned on and off with a simple momentary contact switch on the control panel. As an added bonus, even though the monitor has a logic power switch (as opposed to a simple switch on the AC line), it remembers its power state on AC loss, allowing it to be fully controlled by the relay and not requiring separate manual switching. Plus it takes half a second to power up, reducing the cabinet's initial current surge.
Spring 2003:
A new season and 1,000 hits to my MAME page in under 3 months. Not bad for a crazy pet project. Now if only more people would sign the guestbook. :-)
Picked up a 29" wooden barstool at Wal-Mart to sit on at the cabinet. Also got some more ½" plywood at Home Depot, along with a roll of the ubiquitous black marble contact paper for the final control panel and some angle brackets to support its overhang.
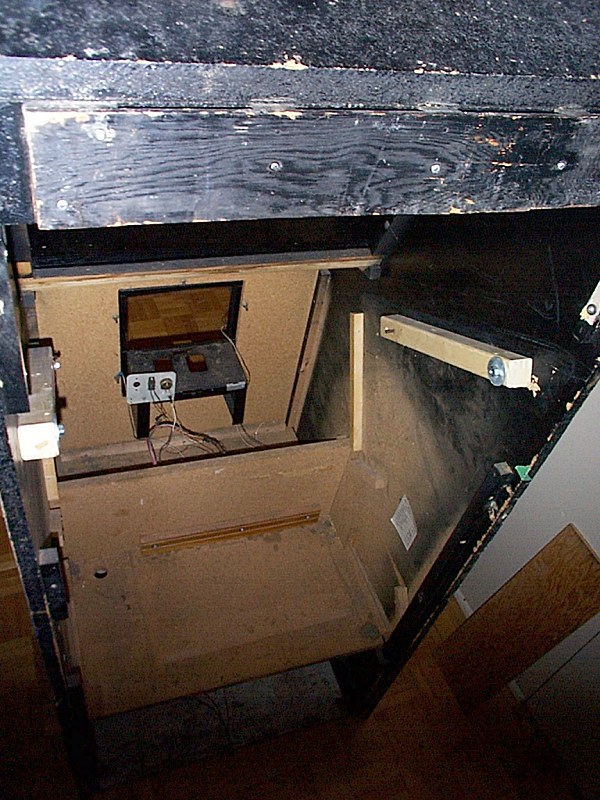
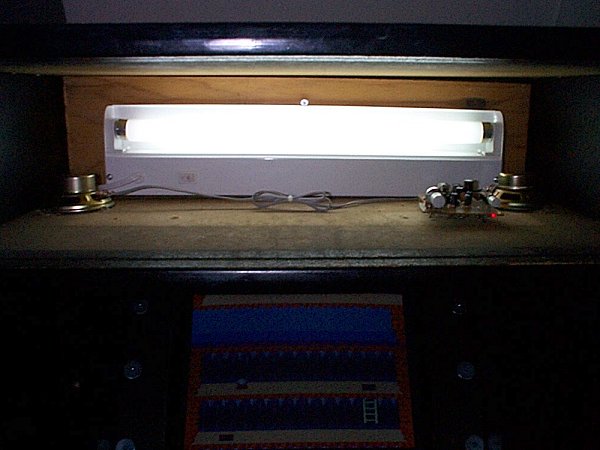
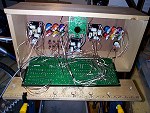
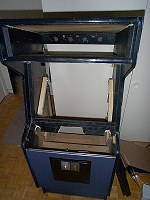
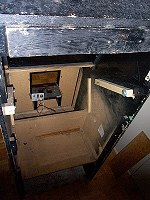
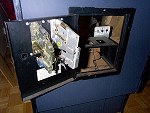
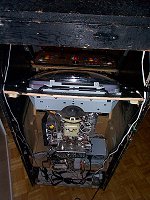
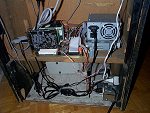
At last some new photos. Inside the marquee shelf you can see the fluorescent light with the two speakers and amplifier that have been removed from their plastic cases. They are visible in the next front view, with 3" chrome wire PC fan grilles adding protection underneath. The third shot shows how the monitor drops into the mounting panel and the hard drive LED sits up in the corner. Finally the motherboard, power supply and drives are seen on the upper shelf, while the subwoofer, power relay (inside the outlet box) and power bar sit below. The glare of the flash tends to make cabinet imperfections stand out. I've since painted over the large metal washers running vertically beside the monitor, the backboard behind the monitor, the cabinet top, and several small blemishes with flat black latex paint.


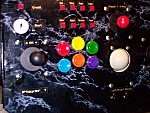
Got the final (for now) control panel drilled in the ½" fir plywood. It splintered a bit (thankfully mostly underneath) due to the flat spade bit, but some wood filler and sanding levelled everything out. The vinyl contact paper was carefully applied, smoothing out bubbles, and the holes trimmed out with an X-acto knife. The player buttons, joysticks and trackball mounted without a hitch. Had to use hot-melt glue to hold the emulation control buttons in place, since they were only threaded down less than ½". Used my trusty old Brother P-Touch PT-15 electronic labeller to mark everything with ½" gold-on-black tape. I'm very pleased how it turned out, despite my lack of woodworking experience. More pix coming soon, once the Oscar Controls Model 1 spinner arrives thanks to Kevin Steele. Also noticed that the Killer List of Video Games recently re-indexed their database, making all my game-specific links point to the wrong machines. This has now been fixed.

This site was featured on the Build Your Own Arcade Controls site (#624) on April 4, 2002, causing a noticeable spike in my hit counter. Thanks, Tom61!
Added a 6' PS/2 keyboard extension cable to allow quick swapping of the control panel with a standard keyboard during maintenance (accessed through the coin door). This works out simpler and cheaper than the keyboard switch or sharing circuit I'd originally considered. Also wired up the left coin mechanism and replaced the generic PCI 10/100 network card I was using (but which was extremely slow, making cabinet backups and upadates over the network take way too long) with a D-Link DFE-530TXS, which is much faster.
Another 1000 hits in just three more weeks. The BYOC entry has really given my little web server a workout. Also added a LG Electronics GCE-8520B 52x24x52 CDRW burner on my network server to keep up with the friends asking me for sets of MAME CDs.
The Oscar spinner finally arrived from Kevin Steele. Three weeks by "air mail" from Ohio, ouch! Must have been the customs inspection at the Canada/US border. I initially had a few minor problems, but now have it working well. Kevin was kind enough to throw in a prototype mechanism of the SlikStik Tornado spinner, which he recently reviewed. It's much smoother and heavier than the Oscar Model 1, and will continue spinning for about 10 seconds after a quick twist. I was able to get it running using the infrared LED/detector pair and Logitech "mouse guts" from the Oscar spinner after much tweaking of their angles and separation. I also learned a lot about spinners. Hint: If a spinner runs "backwards," i.e. the player moves left when it's spun clockwise, try flipping the LED/detector pair upside down. A spinner will typically appear as a single (X-) axis mouse/trackball, but MAME won't always use it the same as a trackball, since it's considered a "dial" device under the analog controls menu. Windows 98 will recognize both a spinner and a trackball at the same time, but DOS (where I run my cabinet 90% of the time) is a whole other matter. Very few DOS mouse drivers support two devices at once - they typically stop looking after finding the first one. Of the three drivers I found that supported two devices at once (two on the Oscar Controls legacy support page, and one on the BYOAC drivers page), only the Optimouse driver referred to by Oscar Controls (hosted on the MAME website) worked properly with my Kensington serial trackball. The other drivers wouldn't see and/or use both devices at once, or fail after running one game. Another unexpected issue which I was luckily able to resolve was that plugging the spinner into the PS/2 mouse port now caused the SoundBlaster Live! DOS drivers to fail because of an interrrupt conflict. This was fixed by setting the motherboard's BIOS to automatically assign interrupts.

The addition of the spinner means that the fundamental hardware side of the MAME cabinet is pretty much finished for the time being. There'll always be software updates, ROMs, and other tweaks to install of course. Eventually I'll probably add some or all of the following improvements as time and money permit: (items already implemented have been struck out)
More hard drive space
- Some way of covering or enclosing the underside of the control panel which sticks out in front of the cabinet
- A layer of Lexan®, Plexiglas® or other transparent plastic on the control panel if wear becomes an issue
Flipper buttons on the sides of the control panel for Visual Pinball, maybe a plunger and tilt switches as well
- A shelf or other method of supporting and displaying books and other arcade memorabilia on top of the cabinet, which is currently sloped too steeply for this
- Replacing the chrome carriage bolts holding in the joysticks and trackball with black anodized ones
I've found some interesting arcade-related books at (the Canadian branch of) Amazon.com. The first two are basically "coffee table" books, containing lots of color pictures and screen shots, while the third is more of a historical reference with only a small section of black and white photos. And no, I don't get kickbacks from this listing, I'm merely a happy reader. :-)
OK, so I lied about being finished with hardware upgrades. Threw in an old, slow, 4.3 GB Quantum Bigfoot CY hard drive to keep Compressed Hard Drive image files on. Used the extra space to get the Daphne laserdisc game emulator running with animation files extracted from my Dragon's Lair DVD-video game by Digital Leisure.
Attached pinball flipper buttons to the underside of the control panel (using metal plumbing strap) for playing Visual Pinball. Configured it to use the "down" switch on the player 2 joystick for the plunger since it can be pulled back with the fingertips and relased, springing forward like a plunger. Just using player buttons for left/middle/right tilt signals for now.
Teamed up with Ian to create The Ottawa Arcade Collector's Club web-based discussion forum. Check it out if you're interested in collecting, restoring, emulating or playing classic arcade games, pinball machines, or jukeboxes.
Got some more information on my cabinet from Rich at Nerd Enterprises, who owned it before Dale and recognized it from this page. He'd sanded and primed it due to water damage, with the eventual intention to make it into a Zero Wing (of "All Your Base Are Belong To Us" fame). It was originally white and also contained a Ms.Pac-Man clone at one point.
Summer 2003:
Replaced the small, slow, noisy pair of WD and Quantum hard drives with a bigger, faster, quieter Maxtor 30 GB, ATA133, 7200 RPM drive. This will make room for upcoming large CHD drive images. The steady stream of MAME updates recetly has meant I've spent more time upgrading the cabinet than playing it. :-)
Fall 2003:
Picked up 15 feet of blue electroluminescent wire (also known as EL wire, neon wire, etc.) through eBay to decorate the cabinet. Not sure where I'll install it yet, but it will likely involve some re-routing of the audio cables, since the wire produces considerable RF interference, no doubt from the inverter driving it. This is really neat stuff (most often used for car accents) that has many other interesting uses.
Winter 2003:
The hit counter reached 5000 almost exactly one year after the MAME page was launched. Not much new to add lately. Had some friends in for a Christmas party, the cabinet was a big hit. Keeping the software and ROMs up to date is occupying most of my MAME time these days. As of version 0.78u1, the 30 GB hard drive is full again, and I'll need to put one of the older drives back in to get more space. A lingering bug with ATI video cards was recently fixed in AdvanceMAME/AdvanceMenu, allowing me to bring these back into line with the latest Windows MAME versions. The high-frequency "blinking" of the EL wire (thanks again to the inverter) seems to be confusing the trackball, so I'll need to re-dress and/or cover up sections of it that can be seen by the trackball's infrared detectors.
Fall 2004:
Yes, I'm still alive. No major changes in the cabinet over the past few seasons, other than software updates. Now using a 3DFX Voodoo3 3000 AGP video card for slightly better performance.
Disaster struck in early September when a disk glitch deleted most of the items in the MAME folder, including all 25 GB of ROM files. Luckily a friend had 0.82 on DVD, getting me 90% back on track to 0.86. This setback prompted me to buy an LG GSA-4120B 12X double-layer DVD±RW/DVDRAM burner so it won't happen again. Alas, all my custom video tweaks for DOS AdvanceMAME are gone too, so I'll be using MAME32 in Windows for the time being. M.A.S.H.'s MameInfo Page has a great tutorial on how to hack the Windows 98 registry to add custom video display modes with Voodoo3 video cards, solving my major issue with using Windows for MAME, namely the slowdown/distortion when being forced to use the standard Windows resolutions.
Fall 2008:
It's been far too long since I've updated this page, but the cabinet's still going strong after several significant upgrades:
An Asus P4P800-E Deluxe socket 478, 865PE chipset motherboard, Intel Pentium-4 3.0 GHz (Prescott core) Hyper-Threading CPU, and 2 GB of dual-channel PC3200 DDR RAM handed down from my desktop PC upgrade.
An ATI Radeon 9700 Pro-based AGP 8X video card with 128 MB of display memory.
A 120 GB Western Digital WD1200JB hard drive that's already 90% full.
A Linksys WMP54G wireless-G card that eliminates having to string a network cable down the hall whenever software updates are required. Also allows the cabinet to stream MP3s and internet music stations during parties and such.
A new Startech ATXPOW400PRO 400-watt power supply to feed the beefier hardware.
Sufficient horsepower to run Microsoft Windows XP Professional (Service Pack 3).
 Visit and add to my guestbook.
Return to Russ' Home Page
or send e-mail to admin@gladden.org .